
Getting started
Beerwright runs at app.beerwright.com. There is nothing to install and nothing to configure before you start.
You do not have to sign in first
Section titled “You do not have to sign in first”Open the app and it works. Your workspace lives in the browser, on the device you are using, and the whole calculation engine runs in the tab, so a guest session is a real session, not a demo. The sync indicator in the sidebar reads Guest — Saved on this device only.
Signing in adds one thing: your recipes sync across devices. Everything else is the same, and you can keep using Beerwright without an account for as long as you like.
Signing in
Section titled “Signing in”There are three ways in, and none of them involves a password: we store none, and there is no password field anywhere in the product.
A magic link. Type your address, press Email me a sign-in link, and open the link in the message. It expires in fifteen minutes and works once. The confirmation screen names the address back to you — “Check you@example.com” — so a typo is visible before you go looking in the wrong inbox.
A passkey. If your browser supports them, Sign in with a passkey sits below the email field, and your saved passkey may also appear in the email field’s own autofill list. A passkey is a key your device makes and keeps to itself — you use it with a fingerprint, a face or your screen lock — and Beerwright only ever stores the public half, so there is nothing on our side that could be stolen and used to sign in as you. Add one from Settings → Sign-in once you are signed in; you can add several, one per device, and remove any of them at any time. Removing the last one is safe, because a sign-in link to your email address always works. Adding a passkey needs a recent sign-in, so if you have been signed in for more than a day the app will ask you to sign in again first.
Google. If the deployment has Google sign-in configured, a Continue with Google button sits below the email field. If it does not, the button is not shown.
The link brings you back to the app signed in. The sidebar footer now carries your address and your plan, and the sync indicator moves from Connecting to Syncing to Synced.
If you had already made recipes as a guest
Section titled “If you had already made recipes as a guest”Signing in to an account that already has a synced workspace does not merge the two, and does not throw either away. The synced workspace is what you see; the recipes you made signed-out are still on the device, and signing out shows them again. The app tells you this when it happens.
Your first recipe
Section titled “Your first recipe”Press New recipe in the header, or Create your first recipe in the empty state, or open the command palette with ⌘K and choose New recipe. Any of the three does the same single thing, which means ⌘Z undoes the whole creation.
If you would rather look at a finished recipe first, the empty state also has Try a recipe. It opens a clone of Sierra Nevada Pale Ale, built from the homebrew recipe the brewery published and sized for your default batch and equipment profile, so the numbers you see are the numbers your rig would make. It is an ordinary recipe once it exists: change it, brew it, or delete it, and ⌘Z takes it away again in one step.
Wherever these pages print ⌘, Ctrl presses the same on Windows and Linux, and the app’s own labels show whichever your keyboard has.
You land straight in the editor on a recipe called Untitled recipe, with:
- no style set, batch size 5 US gal, 60 minute boil
- the Generic 5 gal all-grain (cooler + kettle) equipment profile — 75 % mash efficiency, 70 % brewhouse
- a target carbonation of 2.4 volumes
- one mash step, Saccharification, 66 °C for 60 minutes
- one fermentation step, Primary, 20 °C for 14 days
- empty ingredient lists
Efficiency belongs to the equipment profile, not to the recipe, which is why changing rigs changes the numbers on every recipe you brew on it.
There is no product tour and no coach marks. The empty state points at the one thing worth knowing: press A in the editor to search the catalog.
A tour of the editor
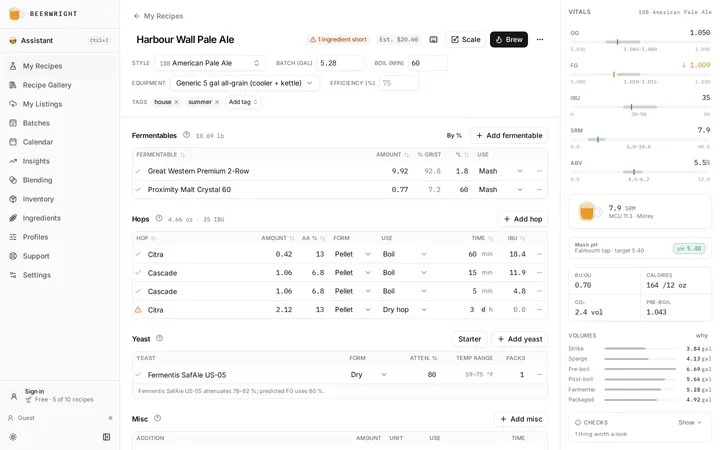
Section titled “A tour of the editor”The editor is a single scrolling column of panels with a sticky vitals rail down the right — not tabs. On a phone the rail becomes a bar docked to the bottom that expands when you tap it.
The header
Section titled “The header”The recipe name is an inline field: type, press Enter to commit or Escape to revert. Beside it sit Style, Batch, Boil and Equipment, then Scale and Brew. The overflow menu holds the things you do to a recipe rather than in it: shopping list, print brew sheet, version history, share, duplicate, export as BeerJSON, delete.
The panels
Section titled “The panels”In order: Fermentables, Hops, Yeast, Misc, Mash schedule, Fermentation schedule, Water & mash pH, Packaging and Notes. On a wide enough screen the two schedules sit side by side. Every one of them updates on every edit, including the salt solver and the mash-pH model — nothing waits on a server.
The vitals rail
Section titled “The vitals rail”Five style-range bars — OG, FG, IBU, SRM (or EBC, if that is your unit) and ABV — sit against the BJCP range for the style you picked, so “in style” is something you can see rather than something you look up. Below them: the color swatch with its MCU and the model that produced it, a mash pH strip, the flavor wheels and the checks, then BU:GU, Calories, CO₂ and Pre-boil just above the volume waterfall from strike water to packaged beer.
Every headline number has an explain popover behind it, showing how that number was worked out and offering to ask the assistant about it. If a figure ever looks wrong, that popover is the first place to go.
The assistant
Section titled “The assistant”⌘J opens the assistant drawer. It reads your actual recipes and works from the same numbers you see, and it never changes anything on its own. A request comes back as a proposal card: a summary, the reasoning, a checkbox per individual change, and a before-and-after diff of the vitals colored against the style range. You press Accept all — or tick a subset and press Accept 3 — or Reject.
Accepting dispatches one batch, so ⌘Z undoes the entire proposal.
If the recipe changed after the proposal was drafted, the card says so and offers to re-check rather than quietly applying stale advice.
Getting around
Section titled “Getting around”⌘K opens the command palette: your recipes by name, style or tag, the actions (new recipe, undo, redo, theme, units) and every page in the app.
⌘Z and ⇧⌘Z undo and redo across the whole workspace, not just the field you are in. The history is deep but it does not survive a reload — delete confirmations say so.
Saving
Section titled “Saving”There is no Save button, and no “Saved” label, because there is nothing to wait for. Edits are written to the browser’s own storage continuously, and if you are signed in they are also queued and pushed to your account. The sidebar’s sync indicator is the only status there is, and what it says when the connection drops is worth knowing before it happens.
Keeping the list short
Section titled “Keeping the list short”A recipe you are finished with does not have to be deleted to get out of the
way. Archive it, from the row’s menu, from the recipe’s own ⋯ menu
while you have it open, or by ticking several and pressing Archive in the
bar along the bottom, and it leaves the list. The Archived chip appears above
the list with a count; press it and the list becomes your archive, with
search, tags and the row menus all working as usual. Restore puts one
back.
Archiving changes what the list shows and nothing else. The recipe is still there, still synced, still exported, and any share link or gallery listing pointing at it keeps working. It also still counts toward the recipe limit on the free plan: archiving clears the list, not the cap.
The checkboxes on each row raise a bar along the bottom of the window, and it follows you down the list rather than waiting at the top. It acts on everything you have ticked: build one combined Shopping list, Add tags, Export as BeerJSON, Archive, or Delete. Tags are added to what each recipe already has rather than replacing them, and each action is a single step, so one undo takes back the whole lot. The ✕ at the end of the bar lets go of the ticks without touching anything.
Sorting by Style puts the list in BJCP guideline order and heads each style as it goes, so 21A American IPA gathers its recipes under one label and anything without a style sits at the end under its own.
Where to go next
Section titled “Where to go next”- Your first recipe, the five-minute walk with pictures.
- Importing recipes, to bring a library across from another tool.
- Water chemistry, the panel that does the most work per click.
- The recipe editor, every panel, in depth.
- On a phone or tablet, for installing it and what changes.
- FAQ, short answers to the things that come up most.
Related
Section titled “Related”- Your first recipe, the same walk with every number explained.
- The recipe editor, panel by panel.
- Keyboard shortcuts, for the five keys and the command palette.
Something wrong on this page? Tell us.